Waterneck Heater Hose Conversion
∟Background
There is a small piece of hose about 3 inches long that runs off the waterneck right above cylinder 1 and connects to a hardline that is your heater core piping. A lot of people have had an issue with this small hose splitting due to exposure of direct heat from being so close to the exhaust manifold, especially if you no longer have the stock heat shield. This writeup will cover the modification of the piping and the parts I used to do this conversion.
∟Parts List
I purchased Summit ss braided hose, as well as the AN fittings and NPT to AN adapter, besides the weld in fitting. You may prefer to go with a different brand, that is up to you. Part numbers are referenced from Summit Racing.
2 - 8 STRAIGHT BLACK HOSE END (SUM-220890B)
1 - 8AN TO 3/8 NPT ADAPTER (SUM-220846B)
1 - 8 MALE STEEL WELD FITTING (EAR-967108ERL)
1 - S.S. BRAIDED HOSE-8 3FT (SUM-230803)
∟Removal of Parts
First off you're going to need to remove the waterneck from the head as well as the hard piping. You're going to spill some coolant so have a rag handy to soak up what you can. I pulled off the upper radiator hose first, then I removed the small 3" section of hose you're going to be replacing as well as the small section of hose that runs down off the hardpipe. Also don't forget to disconnect the two rubber lines back by the battery that run to your heater core. You should have the hard piping out of car now.
I found that removing the thermostat housing and also the power steering bracket/pump helped to reach the 3 bolts that hold the waterneck to the head. It can be a pain in the ass to get the power steering pump free, but it's pretty much a must unless you can find a way to get to those 3 bolts without removing it.
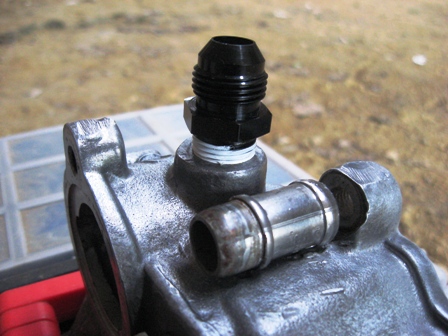
∟Tapping the Waterneck
Once you have the waterneck out, you will need to remove the small nipple that the hose was connected to. Use some WD40 or some PB blast and let it soak in there for a bit. Grab some vise grips and lock onto the nipple and work it out being careful not to apply too much force or you will crack the housing and have to source another. I got it out in less than 5 minutes so it shouldn't take too much effort. The hole diameter is pretty much perfect for the 3/8 NPT fitting. You'll need to tap the hole out with a 3/8" NPT tap. Make sure you clean the housing out real good with some compressed air when finished to remove any shavings. Use some teflon tape on the fitting and thread it into the housing. Again be careful threading it in, you won't need to torque it down hardcore or anything...you don't want to crack it.
∟Cutting Hardpipe & Welding
As for the hard pipe you're going to need to cut it down and have the 8AN male fitting welded onto the end of where you cut. If you're handy with a welder and have some expertise go ahead and do it, otherwise find a friend or a shop that can. The fitting could probably be braized as well, but anyone good with a welder shouldn't have a problem. Once its all cleaned up and done, put some teflon tape on the threads.
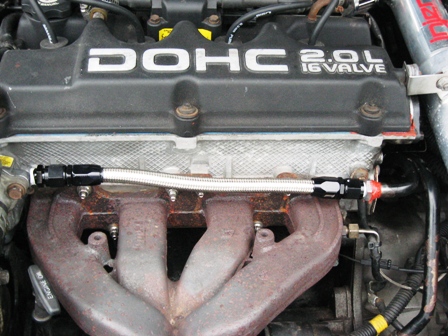
∟Assembling Hose
Now you're going to need to assemble your SS hose and hose end fittings. You'll need to make a clean cut on one end of the hose first. Measure out the length you need. I took some electrical tape and wrapped the area I was going to cut extremely tight. This helps ensure that you do not fray the SS strands. Use some good compound wire snips. Take apart your hose end fitting and insert the hose so it is seated all the way against the fitting. Go ahead and bash the fitting flat onto a hard surface, this will help ensure the hose is seated well. Put some oil on the other end of the fitting and assemble the fitting tight making sure your hose does not back out (it shouldn't if you slammed the fitting and hose down good to begin with). Do the same for the other end. You may need to lock the fitting in a vise to get it completely tightened.
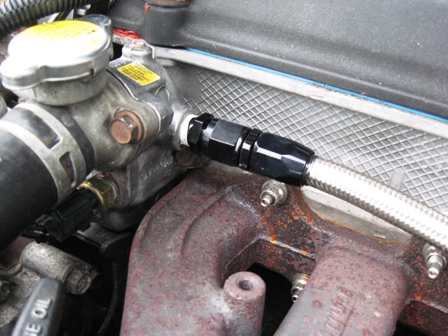
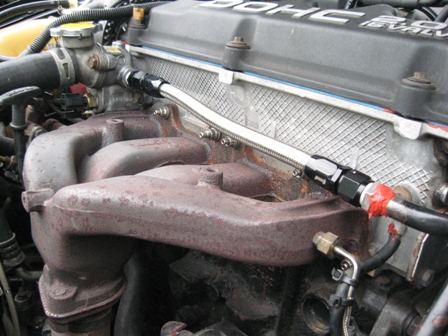
∟Final Assembly
It's pretty straight forward from here. You may want to replace the gaskets at the head and at the thermostat housing if you're worried about it leaking. I was able to reuse the one that seats between the head and water neck. Get your water pipe back on, connect the heater core hoses on the back, and the hose from the lower piece in front. Put the waterneck back on, power steering bracket and pump back in place, thermostat housing and upper radiator hose. Once you've got everything back together and verified. Fill her back up with coolant and start her up. Check for leaks. Depending on your welding skills, you may have a few tiny leaks where the fitting was welded. I did on mine hence why you see some RTV. If you're picky you can take the hardpipe off and see if you can seal it up with some braizing rod. I decided to just put some RTV on there. It hasn't leaked yet and I'm satisfied. Enjoy showing off your flashy hose and fittings.
Contributed by xcasbonx
Powertrain_Maintenance
| 
