

Fiberglass Subwoofer EnclosureHere we will go over the basics of what it takes to make your own fiberglass subwoofer enclosure. Things To Consider Before StartingBefore you start this you need to decide what your subwoofer needs in terms of space. More expensive subwoofers tend to need less space than others to achieve the same thing. I chose a Image Dynamics ID10 that needed .4 cu/ft on the small end. Refer to the manufacturers directions or web site to get the recommended amount of space. Materials- One gallon of fiberglass resin. This is about 35 bucks at Home Depot and will come with hardener. - Gloves. Alot of gloves. - Fiberglass mat and cloth. They are 5 a piece. I used 3 packages of mat and 1 package of cloth. Read on to find out why. - A roll of wide blue painters tape. - An old T shirt or some very stretchy fabric. - 3M Super 77 Spray Adhesive. - Xacto knife. - Sharp scissors. - Fabric to match your side panel. Make sure it has some stretch to it. - 1/2" MDF. You only need a square foot of it, so try to get a stereo store to sell you a piece. - Wooden dowel. - Hot glue gun. - Plastic bucket to mix resin in. - Dremel tool with plenty of cut off discs and sanding drums. The flex shaft attachment makes it ten times easier. - A few cheap 2" paint brushes. Some of this stuff your mom/sister/neighbor probably has such as a hot glue gun, etc. If you dont have easy access to one, buy it, they are not that much. I had spray adhesive, hot glue, and MDF on hand. This cost around 60 bucks. Lets Start!First thing is to remove the panel. I highly recommend using the passenger side panel as that space is useless and it has a nice cubby. 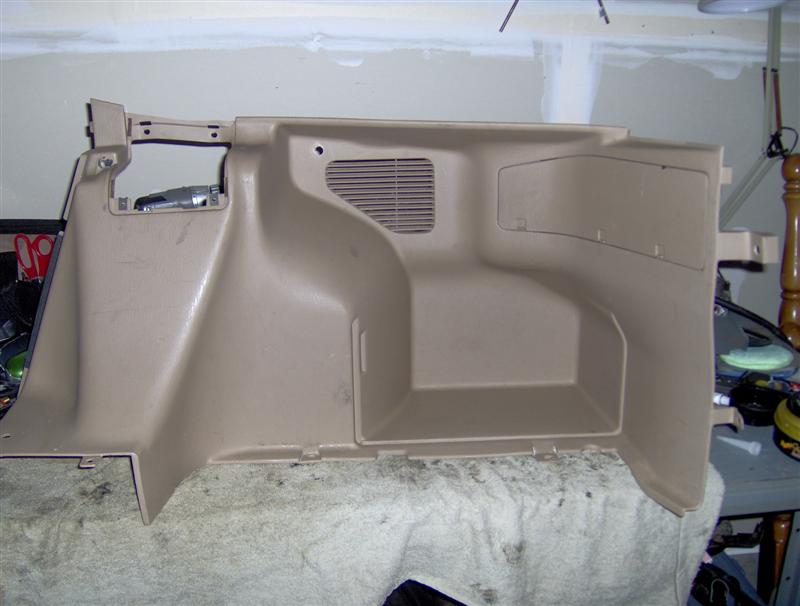 Now, take your painters tape and tape it all up. This is so that the resin will not stick to the plastic. Also makes it pretty easy to remove the mold. Getting the tape to stick good to the plastic is kinda hard. Start with long strips then keep covering, it will get way easier once a foundation is down. You want about two layers. Some people recommend putting aluminum foil over the tape at this point to add in mold release, however I did not find it necessary and 95% of the tape came off. Five minutes with some 220 grit sandpaper would rid the box of any tape remnants easily. 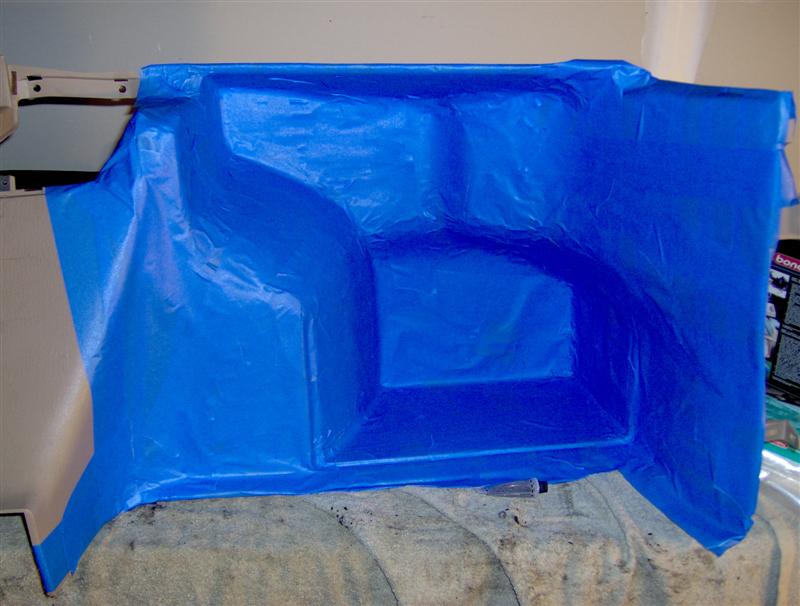 Fiberglass FunOk, there I will give you a brief run down on how to fiberglass. Follow the directions on the can to mix up a batch. I mix about 12-16oz at a time. Take your fiberglass mat and RIP it into 4-6" square pieces. Dont cut it, it wont be as strong and double thick on the edges. Put your gloves on, and pour a generous about of resin into the cubby. Now spread it around. Now grab a piece of previously ripped mat and put it in, making sure to apply pressure so that it is saturated. Let that dry, then add two more layers. You want it like 3/16 - 1/4 of an inch thick. It will then look like this:  Now pop the mold out. Just flex the panel until you can get your hands behind the mold and pull it out, tape and all. Now remove all the tape. You wont get all of it off. It should look like this: 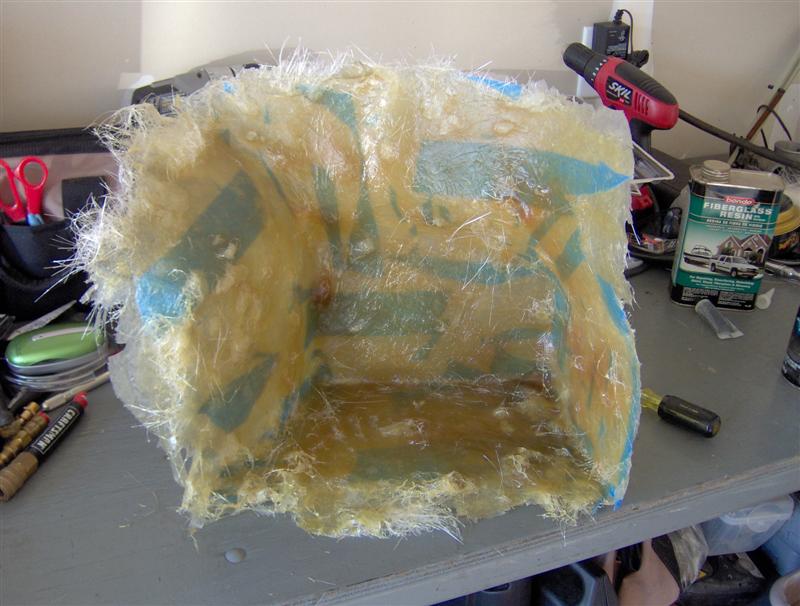 Now you will trim it up. I used a sharpie to outline where I wanted the final box edges to be. Then take a Dremel tool and cut the shape out. Sand down the edges so they are nice and fine. Put it in the panel and you can see how it fits perfect! 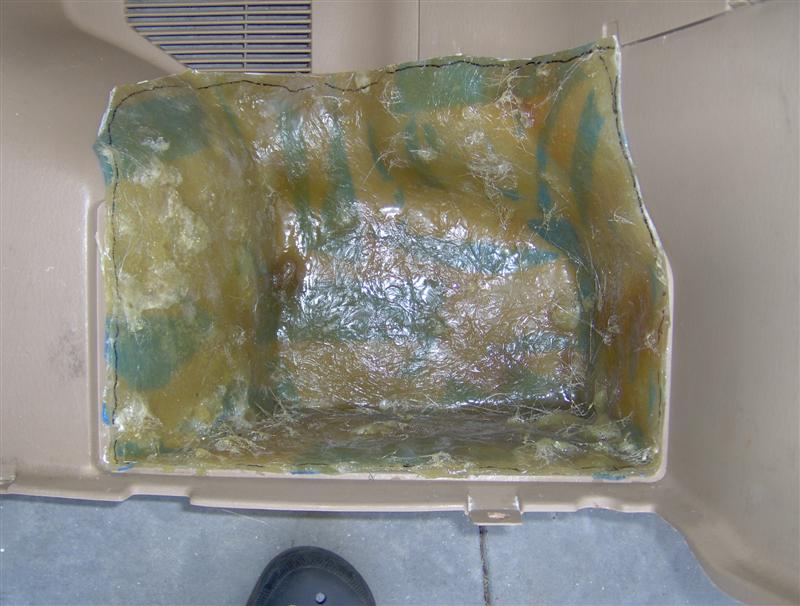 Now add two more layers. You basically use the thumb test. Press on it with your thumb, if it flexes, add more fiberglass. The pressure that your thumb puts out is more than a sub will. Wood WorkSo by now, you should have a solid back to the box that fits into the factory panel. We need to add the ring and dowels to support our sub. Look at your subs instructions and see what the inner ring diameter should, and the outer. Transfer these to a 1/2" thick piece of MDF. Now grab the jigsaw and go to town! 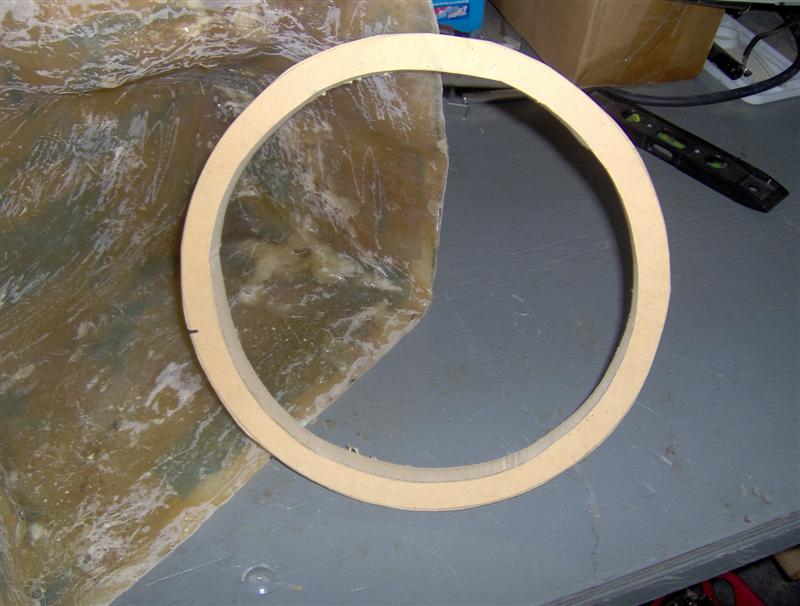 Plug in your hot glue gun. Now the next part is important. We need to mount the ring using the dowel. But you want to make sure that the sub fits in with no clearance issues. So grab your sub, put the ring around it, and place it. I was lucky in that my sub fit with the ring all the way towards the left side, and on the edge. Hot glue the ring there, and cut dowels to space the ring out so that it is level. Once again, use hot glue to keep in place. It should look like this: 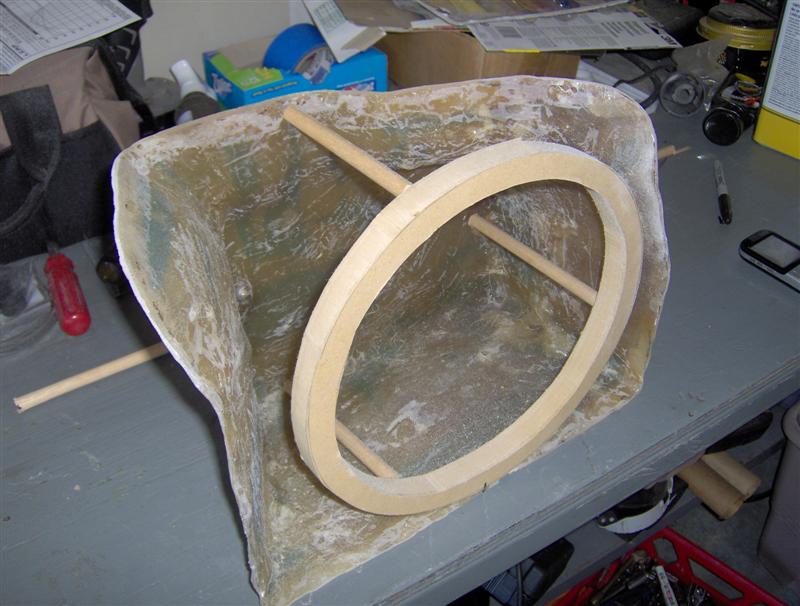 Back To FiberglassNow get all your fiberglass ready to go. Wrap some mat with resin around the points where the dowels meet the ring and the dowels meet the fiberglass rear. 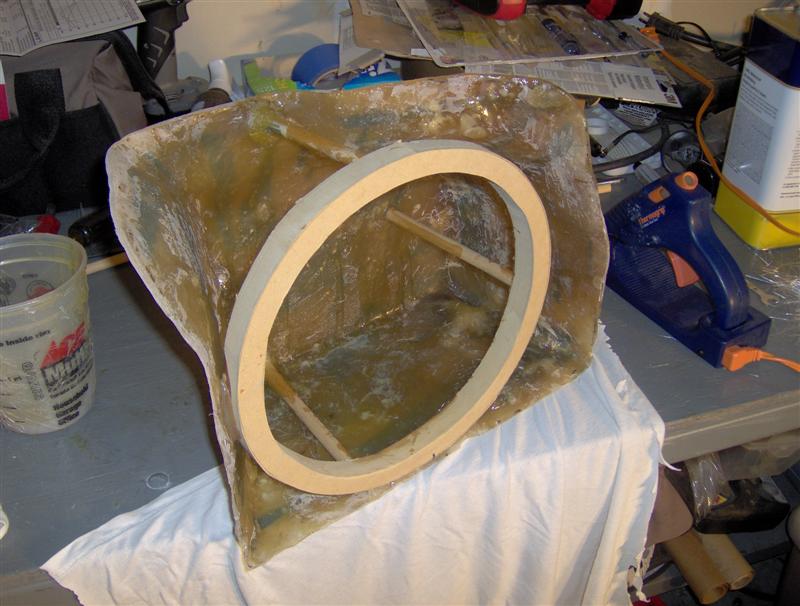 Now cut your old T shirt so you have a piece big enough to cover the front of the box. Get the spray adhesive and spray the shirt. Now spray the ring and edges of the box. Some people use fleece for this step, I chose not to. Apply the T shirt to the box. You want it to have no wrinkles. This is very important, as this is how your box will look when you are done. Skimp here and it wont look as good. 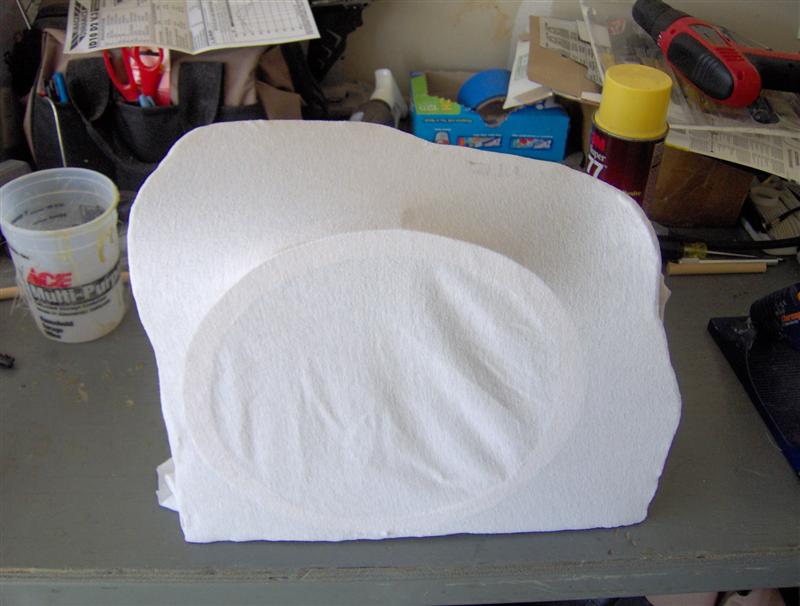 Let it dry which should take about ten minutes. Now mix up some resin and grab a paint brush. Brush the fiberglass on liberally but make sure it doesnt glob up. Make sure not to put too much fiberglass on the edges, other wise it will not fit properly. Now let that dry and trim it up with the Xacto knife. It should look like this: 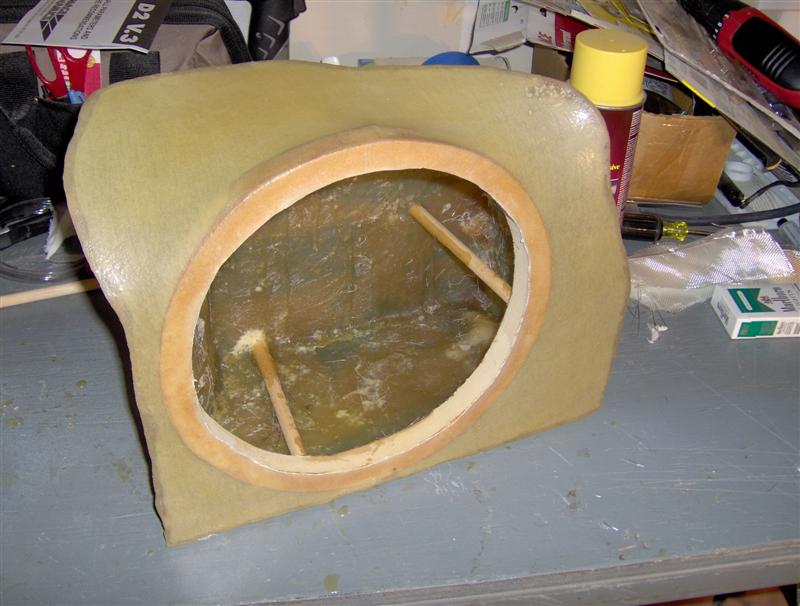 This next part will add additional strength to the edges of the box. Mix up resin and cut some 2" by 6" pieces of the fiberglass cloth. Dip them in the resin and apply to the INSIDE of the box at the edges. I poured the remaining resin in the box and tilted it around until the edges had a liberal amount of resin on it. This will bond the front and rear of the box. Now, to keep it nice and smooth on the outside I used one piece of cloth to layer the exterior. Cut a piece big enough to cover the box and mix up some resin. Now take a paint brush and paint some resin onto the box. Put the piece of cloth over that and paint on more resin. Should look like this at this point: 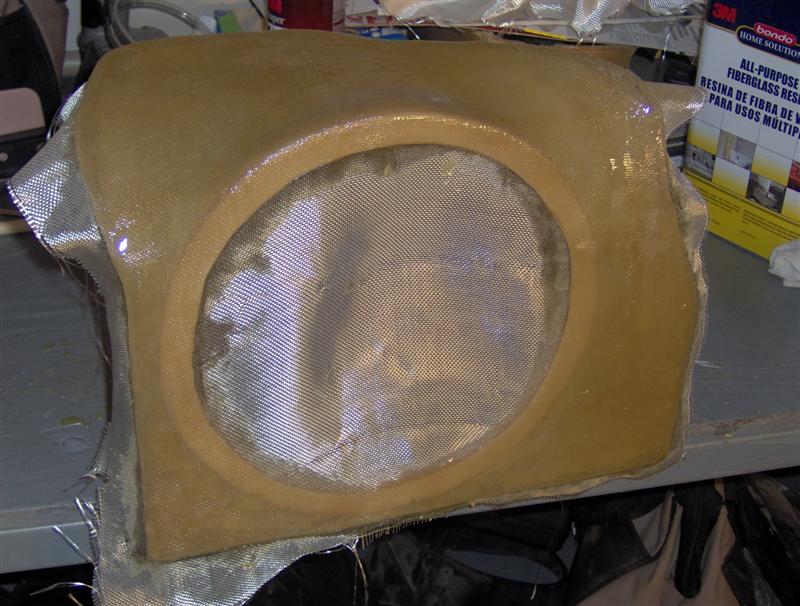 You will want to do this about three times, until you can press it with your thumb with no flex. Now take your cutting discs and sanding drums and smooth the edges out. Pay particular attention to the edges of the box and the mounting ring. Do this until the edges are nice and smooth. You should not have to sand the outside surface of the box because by using one piece it should be pretty smooth. If you are going to paint your box, use 600 grit on it to smooth it out good. At this point I filled it with water 1 gallon at a time to double check the box volume. I wanted .4 cu/ft so the box needed to hold roughly 3 gallons of water. The equation for this is: Gallons x .133 = Cubic Feet Finishing UpOk, this next part doesnt have pictures because they would be repetitive and uninformative. For the wiring, I place the box into the panel, and drilled a small hole through them. I then put about a foot of speaker wire through the wire and put some silicone around the wire INSIDE the box. This way it remains airtight. If you are going to paint the box, I will let you take over from here. I chose to wrap mine to match the interior. Cut a piece of cloth big enough to cover the box. Spray the back of the cloth and the sub box with the spray adhesive. Let it get tacky, then put it onto the box. You want no wrinkles. How I did this was to start at the bottom of the box and work your way up. Pull the fabric taught at the edges and then smooth out with your other hand. Sounds complicated, but take your time and it will come out fine. Hook the sub wiring up at this point. Now pre-drill the holes to mount your sub and screw it in. To secure the box to the panel I used a few piece of 2" wide Velcro. I also put the wire through the panel, then mounted the box to it out of the car. Installation of the panel was just as easy as before this way. Final ProductBy now you should have it installed and pumping out some music! Heres around what it should look like: 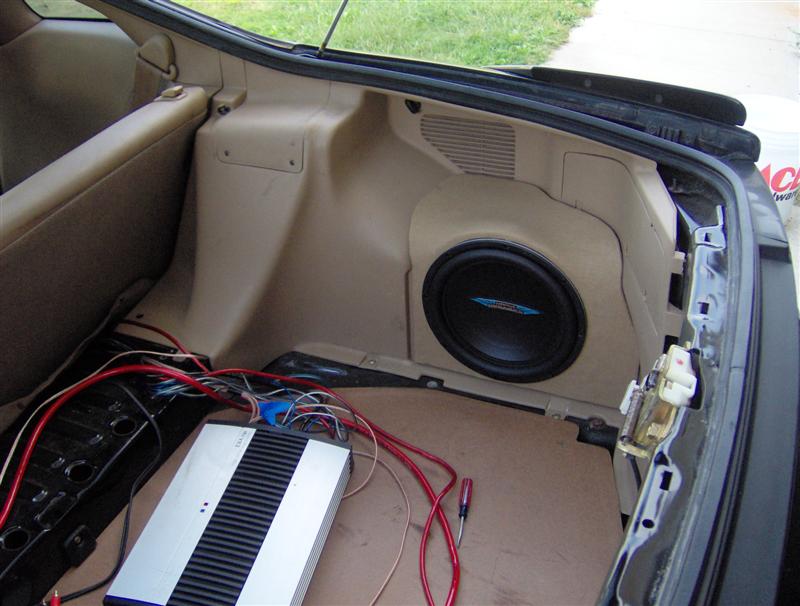 Final WordThis is an awesome project that saves weight and lets you use all of the trunk space you could before. This took me about two weeks working on and off on it. Have fun! |
| Document statistics: Last modified on 2009-09-12 19:19:11 by teklein |