| Project 420a Sleeper, Part 4
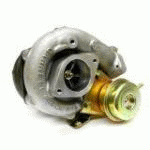
Its about time we lay out our plan of attack on the performance part of this project. As we mentioned already, we are going with a custom made turbo kit as our power adder of choice. We already know that we want to achieve 300hp on this engine with only 8psi of boost so the next step is finding a turbo that is well suited for our application. As luck would have it, I was fortunate enough to acquire a perfect turbo for the project car for FREE! It sure is nice having performance oriented friends around to scavenge parts from. The turbo is a dual ball bearing Garrett GT28R which came off of a Nissan S15 Silvia engine my friend had shipped over from Japan. He planned on upgrading the turbo anyhow so he threw me a bone to get the project moving in the right direction.
 Turbo Turbo
The Garrett GT series ball bearing GT28R, that came standard on the Japanese version of the Nissan 240SX (known as the Silvia in Japan) which came equipped with the SR20DET turbo engine, is everything you'd want for a project like this. It is very efficient and spools quickly reaching full boost as early as 2500 rpm (thanks to the dual ball bearing design), conservatively rated at producing nearly 280-300hp (many Silvia owners have achieved over 270-280hp to the WHEELS with this turbo) and its perfectly suited for a small displacement engine like the 420A power plant. The center housing is both oil and water cooled which should help keep the heat from getting excessive during those hard highway pulls. It utilizes a T25/T28 turbo mounting flange which isn't as common as the popular T3 flange but finding any necessary parts for this turbo are a piece of cake, especially with the growing popularity of the drifting circuit and 240SX project cars.
 Intercooler and BOV Intercooler and BOV
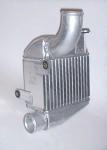
An intercooler will be used to bring down the air temperatures which rise as the air is compressed and also as it passes through the turbos compressor housing (which absorbs heat from the exhaust system passing through the turbine housing). If we were only going to run a small amount of boost (3-5psi) there wouldn't be a real need for an intercooler since the added heat isn't high enough to rob too much performance or cause detonation to become a large factor. Since we plan on achieving the most horsepower we can out of this setup with a maximum of 8psi of boost we will need an intercooler. A lot of people will run a HUGE front mounted intercooler (FMIC) which does look cool, but most are simply over sized for this application. Too large of an intercooler, as well as too large of a diameter intercooler piping, can create a great deal of air volume which the turbo may have trouble pressurizing, not to mention a loss of boost pressure through the intercooler. If the turbo is pumping out 8psi at the turbo's outlet and you only get 5-6psi at the intake manifold due to a pressure drop through the intercooler, you would have to increase the boost pressure at the turbo to compensate. This will make the turbo have to work harder and cause more heat. That kind of defeats the purpose of the intercoolers function huh?
We decided to go with a factory 2G turbo model side mounted intercooler (SMIC)which will reside outside of the engine compartment behind the front bumper on the drivers side. The factory 2G turbo SMIC can handle cooling our air intake charge up to our 300hp goal but thats about the point where it starts to lose efficiency. For intercooler piping we opted for a universal 2.25" piping kit which comes with all of the rubber couplers and clamps. You also could use 2" piping but we are planning on going a bit higher in the horsepower range later on so the additional volume might minimize some restrictions. To help relieve the pressure building up in the intercooler piping once the throttle plate is slammed shut will be a factory air-bypass valve (also known as a blow-off valve, BOV for short) from a 1st generation turbo eclipse/talon. These are one of the most widely used BOV's for custom turbo kits because they are very affordable when purchased used and can hold up to roughly 19psi of pressure and can be modified very simply to hold even higher boost pressures without fail.
 Downpipe Downpipe
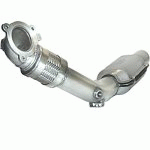
The factory exhaust system can be utilized but it will cause a restriction in airflow as we approach our 300hp mark. At the very least, a custom 2.5" or 3" downpipe alone would reduce some of the back pressure which will help that turbo spool up faster. For the first stages we will construct a very simple adapter which uses a majority of the factory downpipe and exhaust system. We really can't add a free flowing larger diameter exhaust system without it being a little noticeable while driving behind the car. Don't worry, we have an idea to fix that when the time comes.
 FCD FCD
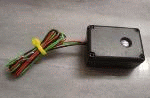
The MAP sensor reads the atmospheric pressure in the intake manifold as it enters the engine. It takes this information, along with other sensors, to determine the proper air/fuel mixture at any given point. Once the MAP sensor sees the air pressure inside the intake manifold become greater than 14.7 PSI, also known as one atmosphere (0 psi of boost pressure or higher), it triggers an engine safety feature called 'fuel cut'. The engine control unit (ECU) starts reducing the amount of fuel being sent into the engine because the factory fuel system cannot support the additional fuel required. Thankfully for us our project car is a '95 model year which does not need any type of MAP sensor bypass, because the ECU didn't come with the 'fuel cut' feature. The factory MAP sensor can handle the additional boost pressures we will be subjecting it to right now, but as we advance beyond the 8 psi mark it wouldn't be able to handle it reliably for a long period of time. If you have a '96 -'99 model you will need to use either an electrical device called a 'fuel cut defender' (FCD) or an air bypass adapter. The FCD simply wires into the MAP sensors wiring harness and doesn't allow the sensor to send its maximum voltage to the ECU, never telling the ECU that it has exceeded 0 psi of pressure.
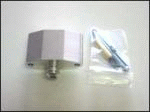 Missing Link Missing Link
The air bypass adapter is simply a check valve which you place between the intake manifold and the sensor (the most common brand used is called the MISSING LINK). When the air pressure exceeds 0 psi, the check valve opens and diverts the air pressure from reaching the sensor. Either of these choices has their ups and down, but they generally get the job done rather inexpensively.
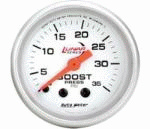 Gauges Gauges
Proper monitoring of the system is a must so we will be adding a boost gauge, EGT gauge (exhaust gas temperature) and a narrowband Air/fuel ration meter. The reason we started with these 3 particular items is it is generally what every do-it-yourself person seems to start out with. As we build on the system we will document where these gauges are useful and what they should (and shouldn't) be used for. A wideband oxygen sensor and logging software system will be replacing just about all other gauges we will have shortly afterward.
 Figuring out Fuel Figuring out Fuel
Get your notepads and calculators ready because our next article will be all about the MOST important part of adding a turbo kit and its NOT the turbo. It's the fuel system, period. There are several methods used for improving the fuel needs when adding a turbo kit and in the next segment we will show you some options you have along with the advantages and disadvantages to each system. If you want to turbo your car, upgrade the fuel system FIRST before you even bother purchasing any other piece for your kit. The more you focus on the fuel system, the better your chances are of having a reliable and powerful setup. About 90% of the blown engines that occur after adding a turbo kit or even a nitrous kit are due to improper fuel systems which were not up to par.
Continue to the 5th article!
420a_Sleeper_Part_5
Back to Project 420a Sleeper:
Project_420a_Sleeper
|
|
Document statistics:
Last modified on 2007-06-30 09:22:31
by totaleclipse_05
|
|

