The Neon 3.55 Gear Mod
Note: Location pictures were hosts has been corrupted. I am working on locating the original copies and getting them back into this write-up. Appologize for the inconvenience.
3.55:1 Neon Trans Swap into a 95-99 2GNT
Objective:
The purpose of this write-up is to give you direction on the required work involved to modify the cable clutch 3.55 Neon trans for use in a 2GNT. Information in this write-up will also cover the work involved if you are installing a new differential in your current trans.
Note:This procedure is written with the transmission already removed from the vehicle. If you need information regarding his procedure, consult your Chiltons repair manual
Requirements:
1. Thorough understanding of Auto Mechanic principals and common practices.
2. 1995+ Neon 3.55:1 Final Drive Trans
3. Hammer and punch
4. Rubber mallet
5. Needle-nose pliers
6. Wooden wedge or shims
Note: the wooden wedges used were purchased from a home depot and are used a shims when installing doors or windows.
7. 2 flat tip screwdrivers, wrap the tips with electrical tape to eliminate sharp edges.
8. Shop rags and brake cleaner
9. Small soft wire brush or green scotch Pad.
10. Anerobic sealant Loctite 518
11. ATF +4 trans fluid [5013457aa](available at dodge/mitsu dealer only) 3 quarts
12. Small amount of wheel bearing grease for assembly
Recommendations:
1. Purchase new axle seals
2. BG Synchroshift trans fluid
Neon 3.55 NV T350 Trans Disassembly
Bellhousing
Backround: The bellhousing on the 1995-2000, NV T350 3.55 Final drive trans requires the bellhousing to be changed out due to the Neon utilizing a cable style clutch and the Eclipse/Talon utilizing a Hydraulic clutch. If you have picked up a 2001+ 3.55 trans then skip to the Axle Seals portion of the write-up and continue. The 2001+ trans already has the hydraulic clutch type bellhousing.
1. Remove the transmission mount plate on trans.
2. Position the trans with the bellhousing facing down, gearbox facing up.
3. Remove the Trans case bolts; note the location of the 2 studs on the frontal portion of the trans.
4. You will find with the case bolts removed the bellhousing does not just fall off. Take a rubber mallet and tap the gearbox away from the bellhousing until the seal is broken. Be prepared in the event there is some trans fluid still in the cases.
5. Even with the seal broken loose the case still will not just fall apart. You will find on the front and rear of the case, located next to the dowel pins in the case, there are slots where you can insert a screw driver to spread the cases. The slot is very shallow, you must not insert a screw driver any farther, failure to observe this may damage the sealing surface causing your trans to leak.
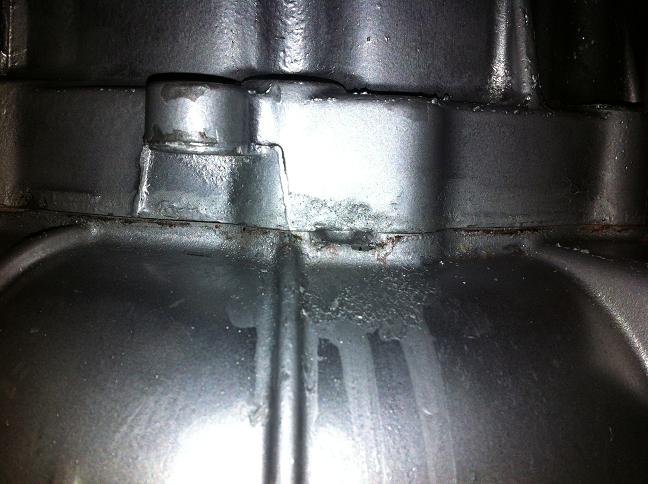
6. As you spread the cases with a screwdriver, (Note: you will only spread them) insert one of the wooden shims to hold that side of the case slightly open. Now repeat on the opposite side. Once you have the cases spread enough to clear the dowels, you will be able to lift the gearbox off the bellhousing.
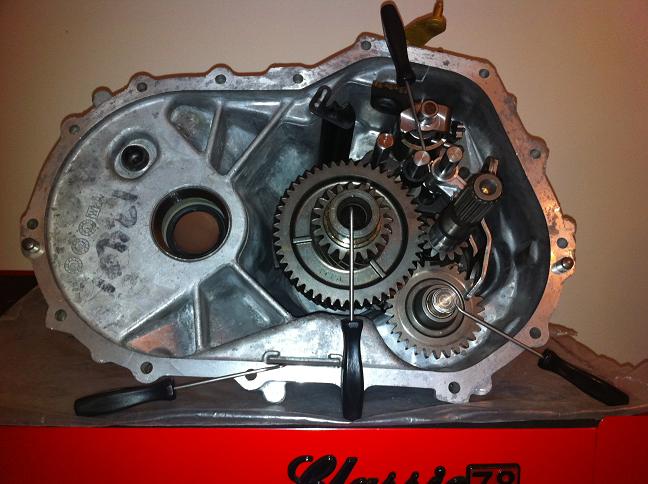
7. As you remove the gearbox, carefully turn it over and set it aside. Lets take a minute to familiarize yourself with what you can see in the gearbox.
Gearbox:
1. The longest shaft sticking out of the trans is the Input shaft. The Input Shaft has your 3/4/5 gears on it. This is the shaft in the picture that does not have a pick pointing to it, just to the right of the middle lower pick.
2. The shorter shaft that sits to the rear of the input shaft is the Output Shaft. This shaft has first and second gear located on it. The pick in the middle of the three lower picks points the the Output Shaft.
3. The smallest shaft located in front of the Input Shaft is the Reverse Shaft. This shaft is a fixed shaft and does not move. Instead the gear located on this shaft is your reverse gear and is slid up and down the shaft with a fork that you can see on the front side of the reverse gear. The pick to the far right points to this shaft.
4. Located above the Input Shaft are the Shift Fork Rails. These rails slide laterally to shift the sliders on the Input and Output Shafts. The pick on top points tho these Shift Rails.
5. Lastly, located above the Shift Fork Rails is another odd looking contraption. This Selector does not move laterally like the Shift Rails; however, it does rotate to select which shaft you are shifting on. As you move your shifter left and right in the car, this selector rotates from Shift Rail to Shift Rail. The Selector is directly above the middle shift rail in the picture.
Note: None of the pieces in the Gearbox will fall out, you can now move the shift levers to simulate shifting to see how the Shift Rails, Selector, and Shift Forks operate.
Back to work on the bellhousing
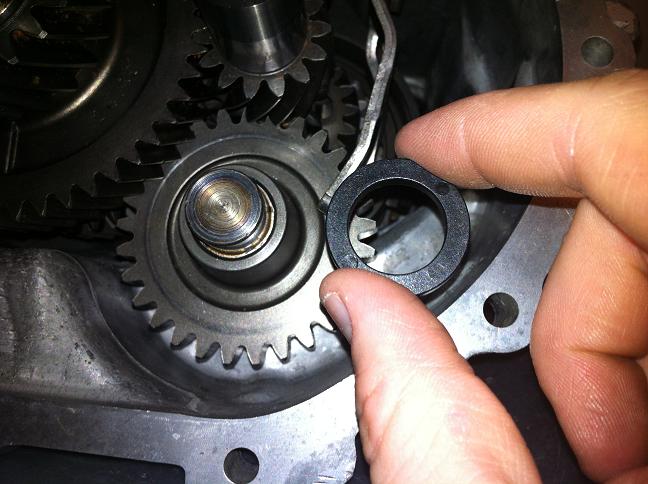
1. With the Bellhousing still sitting on your workbench or whatever, there are a few things to remove before we discard it. Remove the Differential, Output shaft bearing, and the little plastic washer that is sitting where the reverse shaft was sitting.
2. Take the Black plastic washer and put some wheel bearing grease on it and place it back on the reverse shaft in the Gearbox. The grease will hold it in place during re-assembly.
3. Set the Differential and Output Shaft Bearing aside for now. Be very careful with the Output Shaft Bearing, the plastic cage that holds it together is fragile.
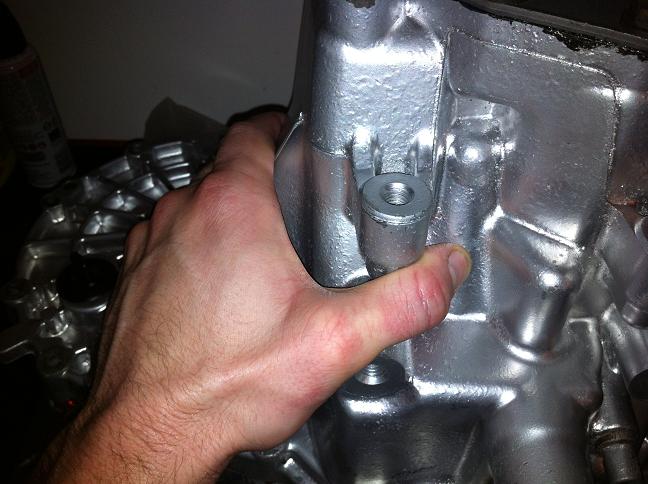
4. If your Neon trans had the speedo sensor in it, remove the speedo sensor and set that aside as well. The sensor is not useable in your 2GNT. The plastic gear however is so save it as a spare.
5. Remove the drain plug from the bellhousing and save it nice to have a spare
6. Place the bellhousing out of your way, you should not need it anymore.
2GNT 3.94 NV T350 Trans disassembly
Bellhousing
1. Just as you removed the bellhousing from the 3.55 trans, you are going to do the same here.
2. Remove the trans mount bracket
3. remove the bellhousing
4. Remove the reverse sensor from the gearbox and set that aside
5. This time Set the Gearbox, Differential, and Output Shaft Bearing to the side and out of your way. If your plans are to box them up for storage, now might be a good time
6. Remove the speedo sensor from the hydraulic bellhousing and set that aside as well.
3.55 Gearbox and 3.94 Bellhousing assembly
1. Take your hydraulic bellhousing, clean the interior of the housing with Brake clean. You want all the trans fluid off the interior portion on the bellhousing. You could use engine degreaser of you prefer for this step. Just make sure it is perfectly dry before you proceed.
2. Take a soft wire brush or scotch pad to scrub the mating surface of the bellhousing, you want all the old sealant removed. If you use a wire brush, the brush must not be able to score the mating surface. You cannot use roloc discs on this surface either. If you remove ANY material from this mating surface, the trans will leak.
3. Spray and clean the housing one more time to ensure it is very clean.
4. If you purchased new axle seals like I recommended, then take this time to remove the old seal from the bellhousing and the gearbox. You can simply use a hammer and punch to force them out from the inside. Do not install the new ones yet.
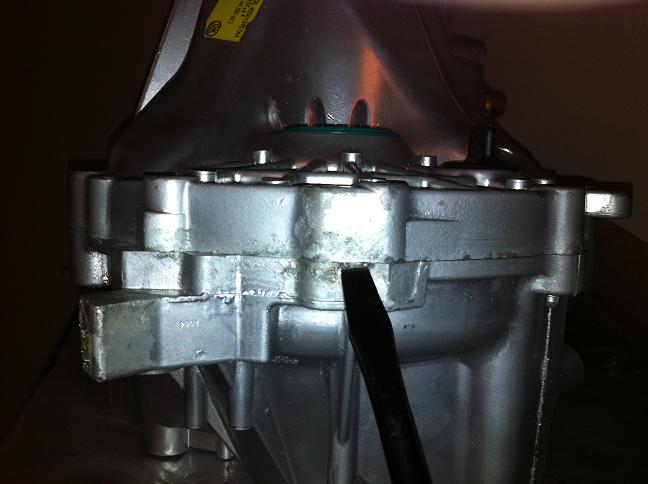
5. Place the bellhousing clutch side down on your workbench, place the 3.55 differential in the housing. If you confused the two differentials because you are not organized, the 3.55 is the smaller of the two ring gears.
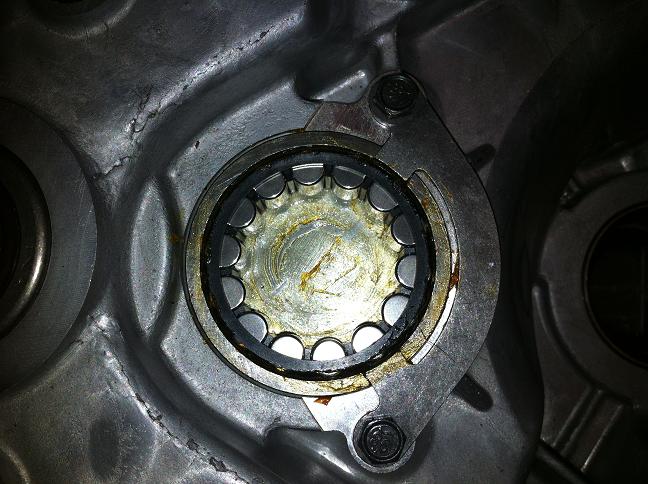
6. Place the Output Shaft Bearing into the housing as well. The first picture is the wrong way to install the Output Shaft Bearing.
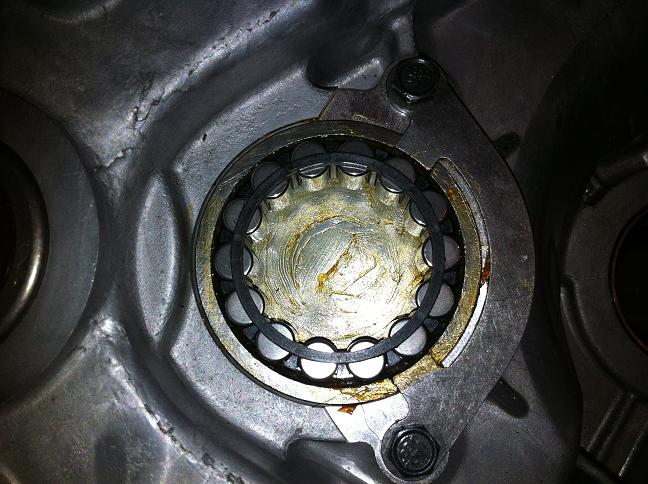
Install bearing with larger diameter cage ring facing out, like this:
7. Take the gearbox and clean the mating surface in the same manner you did the bellhousing. Wipe the surface clean with a rag and brake cleaner. You cannot spray the gearbox down with engine degreaser so don?t go there. The gearbox does need to have any fluid drained out of it though so wipe it down the best you can.
8. When cleaning the Gearbox, on the bottom locate the slender magnet that sits in a groove along the bottom edge. After you are done cleaning, pack the groove with grease and re-install the magnet. You don't want this falling during reassembly.
9. Now take the sealant you have, either RTV or Anerobic sealant and lay an even bead around the full mating surface of the bellhousing. Make sure you cover each side of the bolt holes.
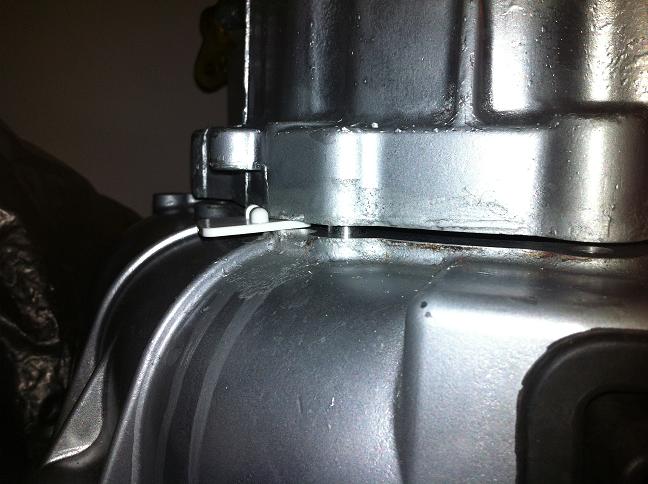
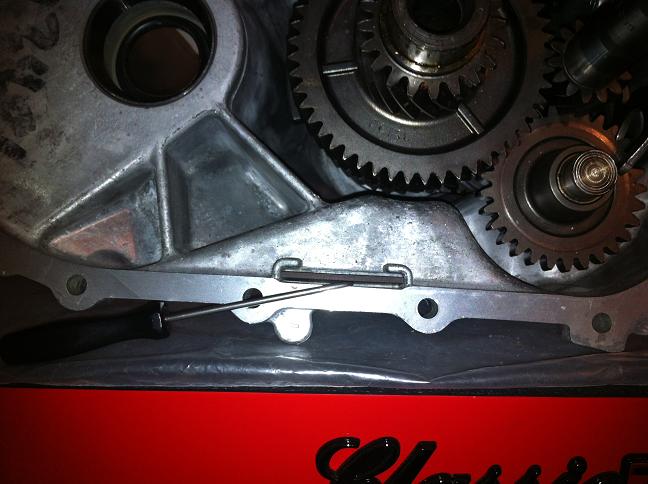
10. Now comes the exciting part. Hold the gearbox (from the sides not the mating surface) with the Input Shaft facing down and slide the Input Shaft through the Input Bearing of the Bellhousing. As you lower the Gearbox, the Output Shaft may hang up on the differential. You will see this happen through the axle hole when the diff moves. When this happens just hold the weight of the gearbox off the differential and twist the gearbox back and forth till the Output Shaft and differential line up. Now the gearbox will drop about lower and hang up on the Shift Fork Rails. This is ok and a good thing.
The first picture is the Output Shaft hanging up and the second picture is the output shaft meshing with the differential.


11. Take a flashlight if you need one and look between the case halves. You want to look at the output shaft bearing and Output shaft to make sure the Shaft is not sitting on top of the bearing. Make sure the black plastic washer is still on the reverse gear shaft and the Magnet has not fallen from the groove of the case.
12. Once again lift up ever so slightly on the gearbox and twist back and forth till the Shift Rails line up with the bearing holes. When they do the gearbox will drop into the Bellhousing. Tap it down with a mallet.
Note: The first picture shows how you can grip and twist the gearbox to get the shift rails to align up and fall into place. Keep in mind one hand is removed during the picture taking process.
13. Install the Case bolts, keep in mind the location of the 2 studs in the front of the case. Tighten all bolts to Spec.
Good job on the case halves, now look around for any part you forgot to install like the Output Shaft Bearing or plastic washer and proceed with throwing a fit because you didn't follow directions. Just kidding..Maybe
Axle Seals:
1. If you didn't remove the axle seals prior, you will need to do it now. Remove the Seals using a grease seal puller or Screwdriver and hammer. Be sure not to gouge the aluminum boss that the seal presses into. If you do it will leak so be careful.
2. To press in the new seal, you have a few options. I prefer to use a large socket that fits around the outer edge of the seal and tap it in with a mallet. You can also use a large mallet that is larger than the seal as a driver. Place the seal in the Boss of the trans, place the mallet over the seal and hit the mallet with a hammer. Another way, if you are very careful you can tap the seal in with a hammer only. You need to tap the seal edge in a circular manner so the seal is driven in evenly. Be careful not to damage the seal.
Shift Levers:
Backround:The shift levers of the Neon Trans will not work in the 2GNT. This doesn't matter what year neon trans you have.
1. You will see a roll pin on each Shift lever of the 3.55 trans. Take a hammer and punch and force the roll pin out. The pins are not extremely tight and should come out with a few strikes of a hammer. The lever will then slide off the shaft it sits on.
2. Remove the shift levers on the 3.94 2GNT Trans.
3. To install the 2GNT levers on the 3.55 trans, place the levers on the shaft with the dowel pin holes aligned. Hold the Pin with a pair of needle nose pliers and tap the pin into the hole with a hammer. This should be relatively easy.
4. The shift levers from the 3.55 Neon trans are pretty much useless to you unless you have a Neon. You can put them with the 3.55 Neon bellhousing and do as you like with them.
Speedo Sensor
Backround:
The Neon Speedo sensor as previously stated is not useable in your 2GNT. It may look the same; however, the internal windings of the sensor are quite different. The plastic speedo gear on the sensor is the same for both transmissions. Do not throw the speedo gear from the 3.55 trans away, keep it as a spare.
1. If your 3.55 Neon trans came with the speed sensor, then gently bend the small plastic tabs holding the sensor gear on the shaft and slide the gear off. Put this gear with your 3.94 trans for safe keeping. Put the Neon sensor with the 3.55 bellhousing, its useless.
2. Take your 3.94 speedo sensor and examine the speedo gear. As long as the gear does not have any damage, you can reinstall the Sensor and gear assembly into the trans and be done.
3. If the speedo gear on your 2GNT speedo sensor appears damaged or worn badly, gently remove it, and use the gear from the 3.55 trans (if yours came with one and it is not damaged)
4. If your speedo gear is damaged and your 3.55 trans did not come with one, you are advised to source a new one from the dealer. Using a damaged speedo gear can damage the plastic mating gear on the Differential.
5. Install the speedo gear onto the speedo sensor and install the assembly into the trans.
Final Assembly
1. Re-install the trans mount bracket
2. Verify the fill plug hole is installed in the trans
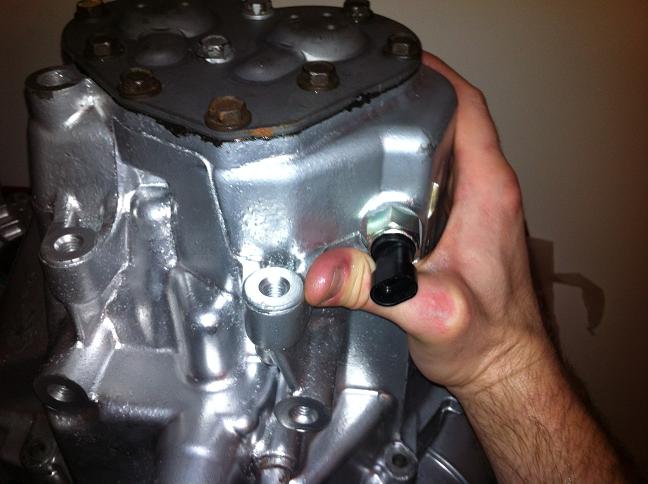
3. Install the reverse sensor.
Disclaimer: If you are unsure of your own capabilities or you damage your transmission in any way during the process listed above, 2GNT or myself accept no liability in any way shape or form. You are obviously an idiot and have no business working on a transmission.
Brought to you by Star_Turbo_Talon for the sole purpose of 2GNT member use.
NV-T350
| 
