

| [b] This page is currently under construction and will be updated further soon... [/b]The Basics* Because of the internal circuitry used in a wideband oxygen sensor, you can't hook up a voltmeter or oscilloscope to read the sensor's output directly. A wideband O2 sensor produces a current signal that varies not only in amplitude but direction. That makes it quite different from a conventional oxygen sensor that produces a voltage signal that bounces back and forth between 0.1 and 0.9 volts. With a wideband oxygen sensor and gauge, you can read the actual air/fuel ratio, and to check the sensor's response to changes that should cause a change in the air/fuel ratio. Opening the throttle wide, for example, traditionally causes a sudden and brief lean condition followed by a richer mixture as the computer compensates. But with the new control strategies made possible with wideband O2 sensors, the air/fuel ratio remains steady when the throttle is snapped open. The diagnostic strategies for wideband O2 sensors vary from one vehicle manufacturer to another but, as a rule, you'll get an oxygen sensor code if the sensor reads out of its normal range, if the readings don't make sense to the computer (should indicate lean when lean conditions exist, etc.) or if the heater circuit fails. Being that on 2gnt's a wideband is an aftermarket addition, which is not controlled and monitored by the existing ECU you will not throw a code unless replacing your stock O2 sensor with the wideband without hooking up the simulated Narrowband output. One thing to keep in mind about wideband O2 sensors is that they can be fooled in the same way as a conventional oxygen sensor by air leaks between the exhaust manifold and head, and by misfires that allow unburned oxygen to pass through into the exhaust. Either will cause the sensor to indicate a false lean condition which, in turn, will cause the computer to make the engine run rich. Another thing to remember, is although most of the Widebands on the market have a simulated narrowband output. This is so that you can put the wideband sensor in the place of the front o2 Sensor. However, people seem to have problems using the narrowband simulation input with our ECUs so it is recommended that you just get another bung welded into your downpipe and prevent any future problems. What you get The Zeitronix ZT-2 kit includes virtually everything you will need to install and use your wideband. I say virtually, because unless if you're replacing your stock oxygen sensor with the wideband sensor, you will need to purchase a bung from either zeitronix or a muffler shop to screw the sensor into in your exhaust. (You can also just get a nut with the same threads and weld that onto your downpipe) Also, the ZT-2 kit is the basics, there are many additional options you can purchase which can run the price of your unit way up, but starting at $279 + $12 shipping its a great bang for your buck. Wiring, what goes where** Pin # Color Function Vehicle Install 1 Red Switched Power (ex. ignition) Cigarette Lighter Power 2 White Wideband Analog Output Option for using with Megasquirt 3 Green RPM Input 0-12v square wave, tach signal ECU 73 (lower) White 4 Orange Boost Sensor Input, Green Boost sensor Wire 5 EMPTY NOT USED NOT USED 6 Yellow Boost Sensor +5 Power, Red Boost sensor Wire 7 Black Power Ground Chassis Ground. 8 Brown Sensor Ground (EMS ground reference) 9 Purple Simultated Narrowband O2 Output (for stock ecu) Only if you removed your regular o2 and replaced it with the wbo2. ECU Upper White/Black stripe 10 Grey Throttle Position Sensor ECU 35 (upper) Brown/Red stripe 11 Brown Sensor Ground (Boost Sensor ground reference), Black Boost sensor Wire 12 Blue User Input 0-5V Misc Input Now that you know what goes where, you're ready to get started, keep in mind that this is something you don't want to have to fool with after installing, so do it right the first time and either solder or use crimp connectors on all your wiring. Don't just twist some wires together and wrap with electrical tape, eventually you will have to fix it. Where to Install This is basically up to you. It is a small unit that can fit many places nicely. But here's a few suggestions... Pull your cup holder/ash tray out and you will see there are a couple uprights at the front edge of where it goes. I have no shifter boot installed at the moment (thieves removed it for me a while back and I've not got around to reinstalling it), so I just reached down and zip tied it to those brackets (NOTE: in FRONT of them. The cup holder will not fit with the Zt-2 on that side, it has to go under the shift boot this way). It is a perfect fit. It's just going to be tricky to get there with the boot installed. (Although you can remove it with a phillips screwdriver from below. -Dr1665 I on the other hand am planning on placing mine in the glove compartment. I chose not to get the display, so it doesn't really have to be close to the drivers side so that I can read anything, and my sunroof leaks right onto my cupholder/ash tray so I don't want to put it where Driggs suggested. I'll let everyone know how it goes, the plan is to be able to just pop the glovebox open and plug in my laptop whenever I want. Install Time Now that you know where you want to place the unit (and the display if you opted to get that also) it's time to start. You must also decide how you want to run your wiring and the harness for the sensor. You can go through the hole in the firewall on the passenger side, you can make a hole in the boot for the steering column, or you can drill another hole through the firewall (be careful doing this and double check where you are drilling) Before you start anything, disconnect your battery since you will be doing some wiring. For the two seconds it takes to do, it's worth knowing you're not going to break anything or shock yourself. Ok, well I already had some wires run through my firewall on the passenger side from some of the ricier things I had installed in years past, so I didn't take any pictures of that, but here's how it went. Here's the RPM wire (lower white) with the wire from the wideband soldered in. 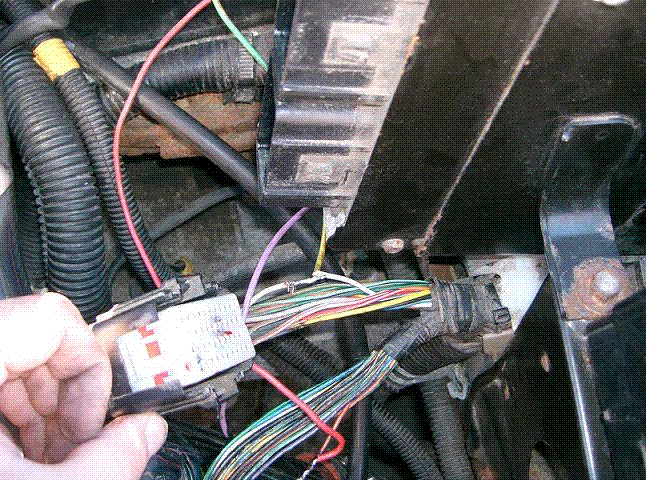 Here's the TPS sensor wire (upper brown with red stripe) with the wideband wire soldered in. This one is much easier to get at than the RPM sensor, the RPM sensor is right in the middle of all the other wires and was just kind of a pain to retape everything back up afterwards. Instead of actually cutting the wire, I just stripped a small portion of it to solder in the wire from the wideband controller. Now that I think about it, cutting it and using the heat shrink tubing over the wire after soldering probably would have been easier but this worked just fine. 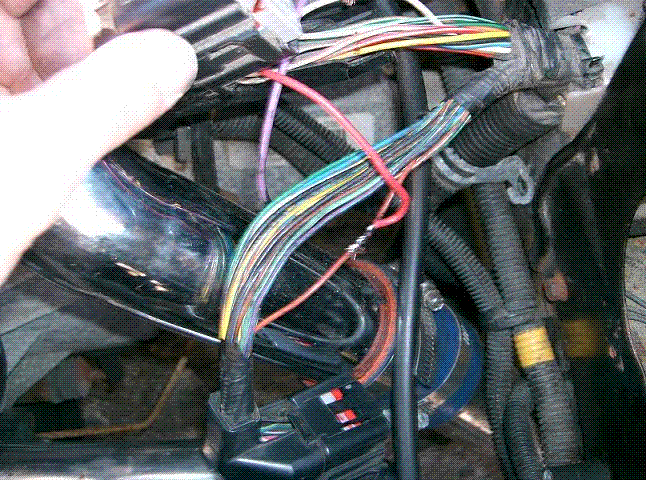 I drilled a small hole in the back of the glove box to run the wires through, the individual wires you really don't need it for, because you can close the glove box with them just sticking out the top of the back of the box, the hole is more for the plug for the wideband sensor. 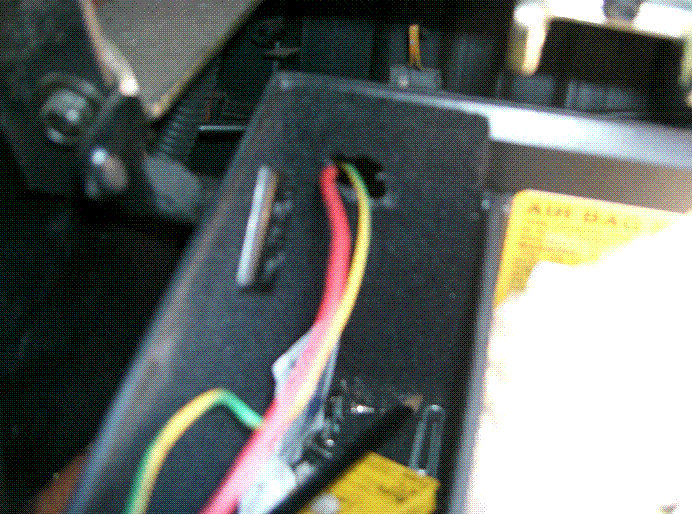 Here is the controller just hanging out in my glovebox where it will remain. I just layed it in in case I needed to move it around and so it would be easier to get to the wiring harness later on if I add options. The only thing I didn't think of is I'm not sure if I can close the glove box when my laptop is hooked up, oh well hind sight is 20/20 I don't plan on driving with the thing hooked up daily anyways. 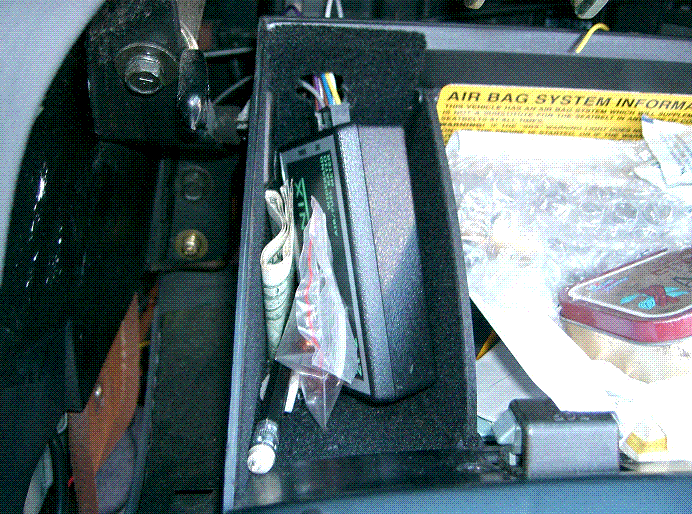 For reference, I hooked my power into the power for my turbo timer since I noticed things like my Cigarette Lighter power wasn't on when the car was timing down and since you are supposed to have the unit powered up whenever the car is running to prevent the O2 sensor from being ruined it was pretty much my only option. Find a good place to ground, and that's it for now. Hook your battery back up and double check everything. I'm telling you this because I'm a dumbass and didn't do this part. Went for a drive and when I got to the end of a road that turns onto another right on a blind curve I pulled out. As I was pulling out I saw a car coming around the corner. Step on it first, let off do shift and the worst flutter followed. Ouch Compressor Surge. The vac line for the BOV was in the way when I was doing my wiring so I unhooked it and forget to hook it back up. My idle's retarded anyway so I didn't notice until that point when I needed to get up and go. [b] Electrical stuff is done, now onto the o2 sensor.... [/b]Since the recommended installation is at least 16 inches away from the turbo and before the catalytic converter, I opted to put the bung in my test pipe since I don't have a cat, no biggie. The sensor must be facing up to prevent damage unlike the way your stock narrowband is, therefore it is recommended it is installed between 10-2. Put the car up on either jack stands or ramps, I used ramps b/c I prefer them. Then crawl under with a marker and sensor and decide where you want to place it, then mark the pipe. Remove either the downpipe or testpipe. Next step is drilling the hole, I went to do this and much to my surprise, I don't have any bits large enough, doh. I make the hole as large as I can with the bits I have then send it off to work with my father. I get a call a little while later that it's done. He used a drill press then welded in the bung for me, sweet! Ok, now you may want to screw the sensor into the pipe before reinstalling it. I made the mistake of opting to not do this, but it wasn't a big deal. 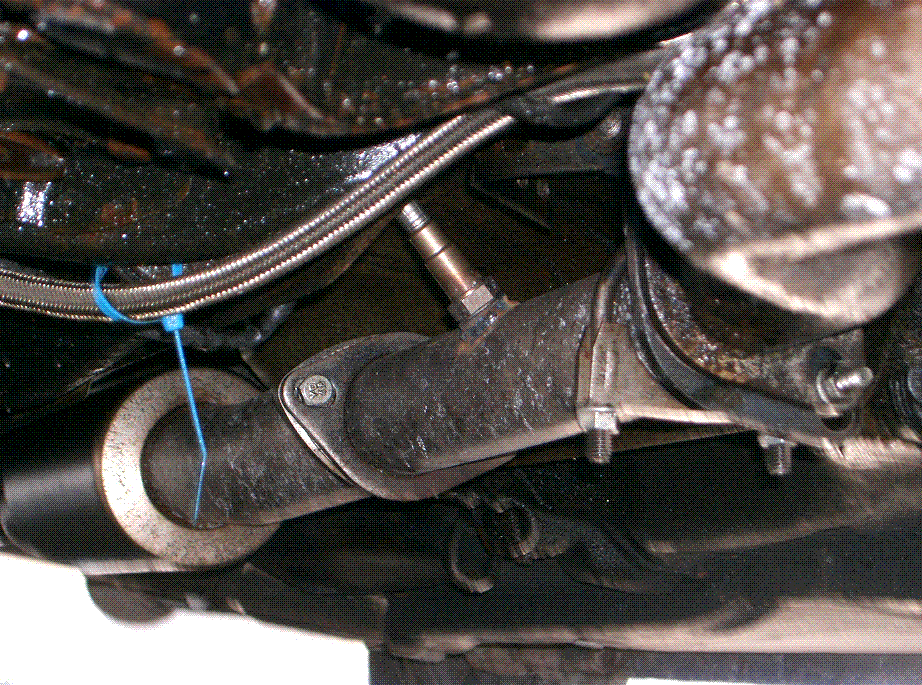 I put the test pipe back on and then went to install the o2 sensor, doh it's a tight fit so I needed to loosen up the test pipe before I could get the sensor in. I didn't have to take it off however or even remove any of the bolts including those on the custom (i.e. ghetto) exhaust hanger Aside from that the whole thing was a snap, thanks in part to my huge oil leak which has kept the bolts in a nice lubricated unfrozen state, lol. Finally, plug in the o2 sensor harness to the o2 sensor, zip tie it in place underneath and run the other end of harness into the car through your choice of location. Because I will be using this on multiple cars, I just pulled mine up the side and through the passenger window. Plug the harness into the controller and you are done. Now it's time to plug in your laptop or your display and start monitoring/logging.... Screenshot: 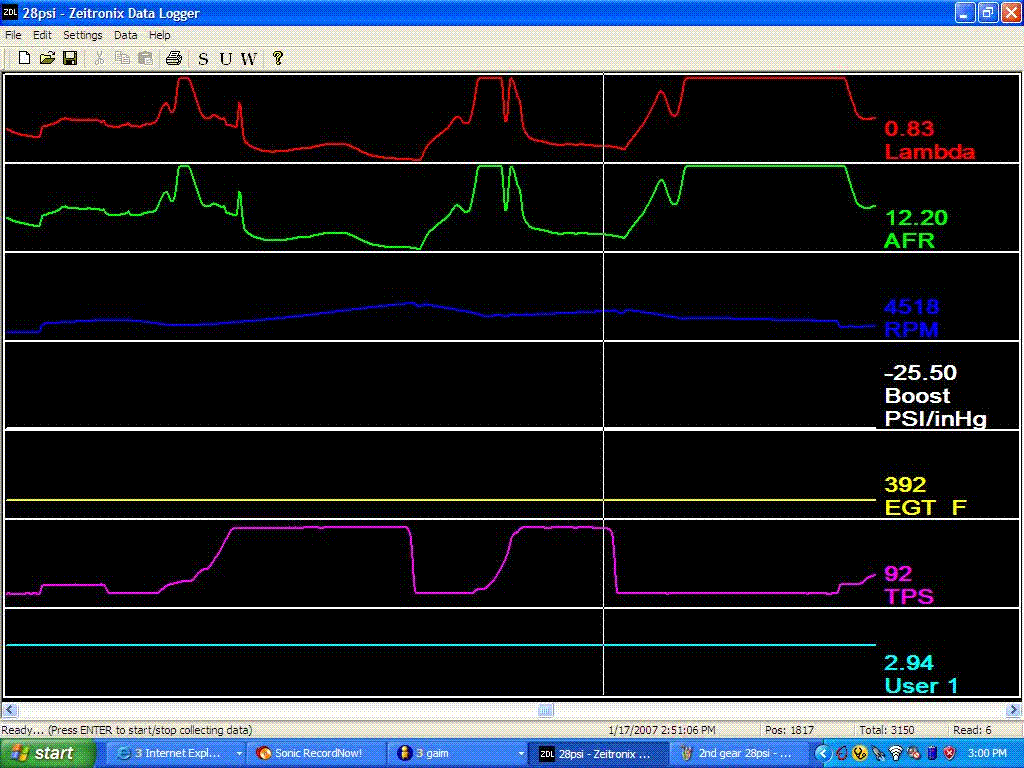 more coming soon (with more pics), *Information provided by: forparts.com[b]**Thanks dr1665 and Eclipse7782[/b] compiled/written by Corey cs82685 please if you add anything to this give yourself credit and add your name. ____________________ Cars Modifications Power Tuning Zeitronix Wideband Install |
| Document statistics: Last modified on 2007-08-03 20:19:03 by cs82685 |